|
Tips
1. A brush may be used instead of the daubers.
2. Always clean daubers when you finish applying a color. Blot in water several times and blot dry on a towel.
3. This is very important: Try daubers on a scrap piece of heavy paper or wood to get the feel of pulling the paint and to learn how much paint you need to apply.
4. This technique can be used to coordinate kitchen tiles, towels or a matching apron. Look around and find other items to accent!
5. Gel pen must be sealed with a spray sealer because otherwise it will smear when water touches it.
|
|
| |
Preparation
1. Wash slate and let it dry several hours. |
|
| |
2. Spray on a light coat of matte finish and let dry. |
|
| |
3. Trace pattern onto tracing paper. |
|
| |
4. Turn paper over and rub chalk over tracing lines. |
|
| |
5. Turn paper over and place chalk side down on slate. Trace only the border onto the slate surface. Remove paper. |
|
| |
6. Using foam brush, paint the center of the slate Licorice, leaving the gray slate for the border. Let dry. |
|
| |
7. Paint a Napthol Crimson line on the outside edge of the black center, using liner brush. Let dry. |
|
| |
8. Place the pattern on the slate again and transfer the vegetables and lettering onto the surface. |
|
| |
Painting
Onion
l. Dampen dauber in clean water and blot on a paper towel to remove extra water. |
|
| |
2. Dip damp dauber into Wicker White and blot any excess paint on a damp paper towel. |
|
| |
3. Place dauber on top of onion, then pull down and around the left side, pulling into the bottom. |
|
| |
4. Repeat step 3, pulling down on the right side and bottom. Pull down in the middle to fill in and let dry. |
|
| |
5. If paint is too thin, repeat steps 3 and 4; let dry. |
|
| |
6. Dip one side of damp dauber in Raw Sienna, then turn dauber and dip the other side in Wicker White; blot. |
|
| |
7. Place dauber with Raw Sienna to the right on the right side of the onion and pull down from the top. Soften by lightly patting the surface with dauber. Let dry. |
|
| |
8. Use liner brush with a little Raw Sienna and brush on a few detail lines for the onion skin. |
|
| |
9. Repeat step 8 using Wicker White. Let dry. |
|
| |
Onion stem
1. Use liner brush or #4 brush and paint Sap Green on the stems at the top of the onion. Let dry. |
|
| |
2. Paint a few detail lines on the left sides of the stems with liner brush and Hauser Green Medium. Let dry. |
|
| |
Tomato
1. Dip damp dauber in Napthol Crimson and blot on a wet towel. |
|
| |
2. Place dauber at the top of the tomato, then twist and pull down and under on the left side. |
|
| |
3. Repeat step 2 on the right side of the tomato and fill in the center. Let dry. |
|
| |
4. A second application may be necessary, so repeat steps 2 and 3. |
|
| |
5. Dip one side of dampened dauber in Red Light and the other side in Napthol Crimson. |
|
| |
6. Place the right side of dauber loaded with Red Light at the top right side of the tomato and pull down and under the bottom. Soften by lightly patting with the dauber. (image s25) |
|
| |
7. Repeat step 6 for the center of the tomato and let dry. |
|
| |
8. Use liner brush and Red Light to brush on some detail lines on the left and top of the tomato. Don't blend. Let dry. |
|
| |
Tomato stem
1. Use liner brush and paint the stem with Sap Green. Let dry. |
|
| |
2. Using liner, paint a few line strokes on the left side of the stems and pull into the stem. Let dry. |
|
| |
Bell pepper
1. Dip damp dauber in Sap Green and blot on damp towel to remove any excess paint on the edge. |
|
| |
2. Place dauber at the top of the left side, then twist and pull down and under on the pepper. |
|
| |
3. Repeat step 2 for the right side of the pepper and for the center section. Let dry. |
|
| |
4. If a second application of Sap Green is needed, repeat steps 2 and 3. |
|
| |
5. Dip one side of damp dauber in Hauser Green Medium and the other side in Sap Green. Blot on damp towel. |
|
| |
6. Place dauber at top of pepper, with the side loaded with Hauser Green Medium to the left side of the pepper. Pull down and under. |
|
| |
7. Repeat step 6 for the right side and for the center section. Let dry. |
|
| |
8. Using liner brush and Hauser Green Medium, pull a few highlight lines down the left side of each section. Also, highlight the tops of the sections behind the stem. Let dry. |
|
| |
Pepper stem
1. Using liner brush, paint the stem with Sap Green and let dry. |
|
| |
2. Paint a few highlight or detail lines on the left side of the stem using Hauser Green Medium and liner brush. Let dry. |
|
| |
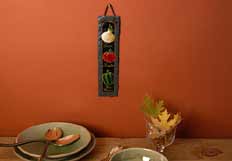
Outlining and lettering
1. Use gold marking pen to outline all the parts of the vegetables. |
|
| |
2. Make a few detail or contour lines on the vegetables if desired. |
|
| |
3. Write each vegetable's name. |
|
| |
4. Pull a gold line on the outside of the Napthol Crimson line surrounding the center. |
|
| |
Finishing
1. Mist spray 2 or 3 coats of the acrylic matte sealer on the surface to seal in the gold marker and protect the painting. Let dry between each coat. |
|
| |
2. Tie a raffia bow to one of the leather ties and hang this beautiful project on the wall, or give it to someone special. |
|

